On the face of it, it would seem that progressive web applications are simply static files and JS code that can be hosted similarly as static websites. In fact, PWAs provide many more benefits and thus require more elements that demand your attention when building and deploying such an application.
I would like to present these aspects and demonstrate the possibility of how you can deploy a modern app to AWS, the right way.
In this article, you will learn how to deploy your modern PWA application on AWS using S3 for storing the content, CloudFront for distributing the application, and Lambdas functions for handling push-state URLs and server-side rendering. Also, we will explain what to look for in terms of how PWAs and CloudFront cache work.
Why Choose AWS CloudFront for PWA Deployment?
First of all, you may ask which service you should use in front of your app, and why choose CloudFront? In one of our previous blog post, we outlines the benefits of using a CDN like CloudFront, highlighting improved performance and scalability.
But what else does it give us? CloudFront is a powerful tool, it allows associating special lambda functions called Lambda@Edge. They give us full control over how requests are handled under the hood and what is returned to the browser. We can use them to achieve attractive URLs without ending extensions and to provide pre-rendered HTML pages for search bots.
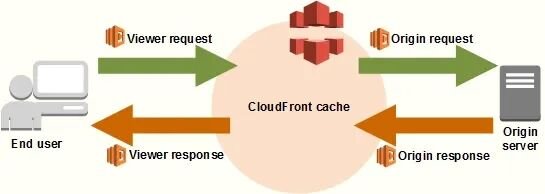
Lambda@Edge functions allow us to modify the request/response cycle during any of the following stages:
- After CloudFront receives a request from a viewer (viewer request)
- Before CloudFront forwards the request to the origin (origin request)
- After CloudFront receives the response from the origin (origin response)
- Before CloudFront forwards the response to the viewer (viewer response)

Source: Amazon Web Services (AWS)
Implementing Server-Side Rendering (SSR)
How Does This Work?

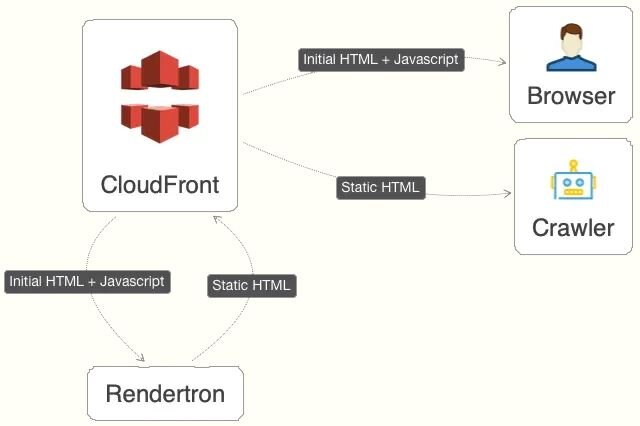
Crawler Detection
CloudFront caches responses against the request headers it sends. It does not forward the user request’s User-Agent to the origin, therefore limiting the header’s data, hence decreasing the number of hits to the origin.
So how do we detect a crawler?
We still need to forward the User-Agent header to the origin, but we reduce the number of unique values.
Instead of the real value of this header, we will use our own value. We set it to SSR if the header matches any whitelisted search engines, otherwise, we simply set it to CloudFront. In doing this we only have two possible values of this header.
Custom Headers
First of all, we need to add a User-Agent to the whitelisted headers in our CloudFront distribution.
We can do that via the AWS dashboard:
CloudFront Distributions > <your distribution> Behaviors > Edit > Whitelist Headers > Enter a custom header User-Agent > Add Custom
Enhancing SEO with Viewer Request Lambda Functions
Since this function always runs with the client's request, it shouldn’t be necessary to call on any external services or resources.
Let’s write the first Lambda function to detect crawlers:
const path = require("path");
const botUserAgents = [
  "Baiduspider",
  "bingbot",
  "Embedly",
  "facebookexternalhit",
  "LinkedInBot",
  "outbrain",
  "pinterest",
  "quora link preview",
  "rogerbot",
  "showyoubot",
  "Slackbot",
  "TelegramBot",
  "Twitterbot",
  "vkShare",
  "W3C_Validator",
  "WhatsApp"
];
exports.handler = (event, _, callback) => {
  const { request } = event.Records[0].cf;
  const botUserAgentPattern = new RegExp(botUserAgents.join("|"), "i");
  const userAgent = request.headers["user-agent"][0]["value"];
  const originUserAgent =
    botUserAgentPattern.test(userAgent) && !path.extname(request.uri)
      ? "SSR"
      : "CloudFront";
  request.headers["user-agent"][0]["value"] = originUserAgent;
  callback(null, request);
};Dynamic Rendering with Rendertron for PWAs
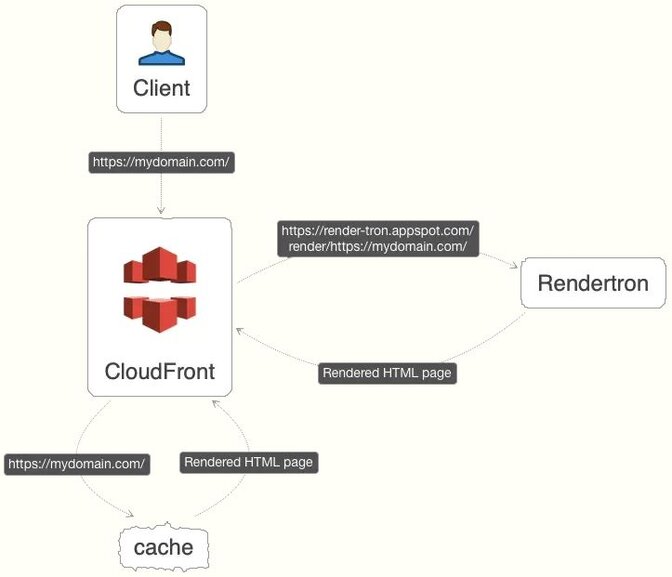
This dynamic rendering app was created to serve the correct content to any bot that does not render or execute JavaScript. Since it’s a standalone HTTP server, it’s easy to use and integrate with existing projects. There is a fully-functional demo service which is great for exploring this tool at the beginning. For production usage, consider using your own instance of this service.
The next step is to create a Lambda function which, depending on the user agent set, will return the original response or ask Rendertron for the static HTML page version and then send it back to the client.

const path = require("path");
const https = require("https");
const keepAliveAgent = new https.Agent({ keepAlive: true });
const ssrServiceUrl =
  process.env.SSR_SERVICE_URL || "https://render-tron.appspot.com/render/";
exports.handler = async (event, _, callback) => {
  const { request } = event.Records[0].cf;
  if (needSSR(request)) {
    const response = await ssrResponse(getRenderUrl(request));
    callback(null, response);
  }
  callback(null, request);
};
const needSSR = request => request.headers["user-agent"][0]["value"] === "SSR";
const getRenderUrl = request => {
  const url = `https://mydomain.com/${request.uri}`;
  return `${ssrServiceUrl}${encodeURIComponent(url)}`;
};
const ssrResponse = url => {
  return new Promise((resolve, reject) => {
    const options = {
      agent: keepAliveAgent,
      headers: {
        "Content-Type": "application/html"
      }
    };
    https
      .get(url, options, response => {
        let body = "";
        response.setEncoding("utf8");
        response.on("data", chunk => (body += chunk));
        response.on("end", () => {
          resolve({
            status: "200",
            statusDescription: "OK",
            body
          });
        });
      })
     .on("error", reject);
   });
};
Deploying with AWS Cloud Development Kit (CDK)
Now that we know how to properly configure CloudFront and what Lambda functions should contain, it’s time to connect all the pieces together and deploy our application. Instead of creating all required resources manually, we will automate this process using a great tool from AWS — Cloud Development Kit. It allows us to model our infrastructure and provision the app’s resources using, among other languages, JavaScript. It’s easy to prepare reusable modules divided into logical parts or larger, high-level app components that describe the entire app environment.
Here is a list of the AWS resources that we need to create our static application:
- S3 Bucket — for storing app content
- Viewer request Lambda function — to detect crawlers and set request headers
- Origin request Lambda function — to handle server-side rendering
- Access Identity and Roles — to allow services access to collaborate
Via the following URL, you can find ready-to-run code that will automatically build necessary resources for our app.
All that’s left is to go through the step-by-step instructions from this repo and upload the application’s content to the appropriate S3 bucket.
In the command output, you’ll see a dedicated CloudFront URL where your app will be accessible.