
This guide walks you through adding content, structuring navigation, and setting up static pages so everything runs smoothly from day one.
In Nimara, everything managed through ButterCMS falls into two main content types, ensuring a structured and flexible setup:
With this setup, you can keep your content organized and make updates without touching the code.
It all starts with the Navigation Menu collection. The name of an entry determines whether it is used for the main navigation or the footer.
This simple naming convention allows Nimara to automatically map content to the correct place — no extra configuration is needed.
Each Navigation Menu entry references a list of Navigation Menu Items, which are the actual clickable links shown in the menu.
The relationship between the Navigation Menu and the Navigation Menu Item is one-to-many, meaning each navigation can have several items.
Each Navigation Menu Item can also reference Navigation Menu Item Second Level entries, allowing you to define nested (dropdown) menus.
This creates a flexible two-level structure, perfect for product categories with subcategories or sections with deeper navigation.
Here’s a diagram showing how the pieces fit together for a Navbar with two levels:
Now that you understand how navigation in Nimara is structured, it's time to build it out.
Since the menu supports both top-level and nested links, you must set up collections defining these relationships.

If your navigation includes dropdown menus, you’ll need a second-level collection to handle nested items. This keeps your submenus structured, organized, and easy to manage.
In Nimara, second-level menu items (the ones that appear inside dropdown menus under a top-level link) are stored in the Navigation Menu Item Second Level collection.
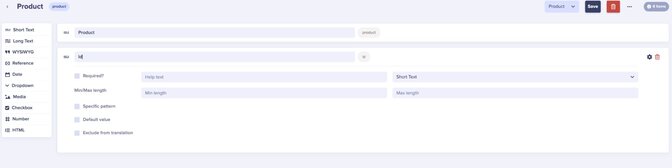
Before adding entries, you need to set up the collection with the fields shown in the graphic below.

Here's what each field means:
Now that the second-level structure is in place, it’s time to set up the top-level navigation.
The Navigation Menu Item collection defines first-level menu items in Nimara’s navigation, whether they belong to the main Navbar or the Footer.
This step is quite similar to the second-level setup but with a key difference: instead of being nested under another menu item, these entries serve as the main menu links. They can also reference second-level collections if dropdowns are needed.
Before adding entries, you must again set up this collection with fields like Name, Page (for static pages), URL, and a reference to second-level items.
This ensures each top-level menu item can link to the correct destination while optionally supporting submenus.

What Each Field Does:
The Navigation Menu collection is the top-level container that defines whether the menu is the main site navigation (Navbar) or the footer (Footer).
This collection doesn’t hold individual links itself. Instead, it references the Navigation Menu Items you’ve already created.
Before adding entries, you’ll first need to set up the collection with these fields:

Once your Navigation Menu, Navigation Menu Item, and Navigation Menu Item Second Level collections are set up and linked together, all that’s left is to add the actual data:
And boom - your shiny new navbar (or footer) is ready to roll in Nimara!
The Homepage and Static Page are Page Types in ButterCMS.
Unlike collections (like Navigation Menu), you can use Page Types to define the structure of individual pages - in this case, the Homepage and the Static Pages.
The Page Type must be created under Content Types > Page Types in Butter CMS before you can add actual homepage content.
The homepage should contain the following fields:

Here’s how it looks on the front:

The Carousel Products field in ButterCMS doesn’t store full product details like name, price, or images. Instead, it acts as a collection of product references. Each entry includes:
When Nimara renders the homepage, it uses these Saleor product IDs to fetch the actual product data directly from Saleor’s API.
This allows Butter CMS to act as a lightweight content manager while Saleor remains the single source of truth for product data.
Static Page should contain the following field:

Go to Pages > New Page in Butter CMS, and select the Homepage / Static Page type.
Whether you’re populating the Homepage or creating a new Static Page, the process is pretty much the same — you get complete control over the content directly from Butter CMS.
Once the initial setup is complete, non-technical teams can handle most of the content management right inside ButterCMS.
Need to update the navigation, swap out a homepage banner, or add a new static page? No problem. Marketing and business teams can do it all without waiting on developers.
By keeping CMS integration structured and flexible, Nimara lets developers focus on building features and allows content teams to manage updates easily.